
Investing in a high-quality surround sound system is only the first step toward cinematic nirvana. The real magic happens when every speaker is perfectly positioned to work in harmony with your room's unique acoustics. Poor placement can turn a premium audio experience into a muddled, confusing mess, with dialogue lost and effects misfiring. This guide moves beyond generic advice to provide a definitive roadmap for the best surround sound speaker placement.
We will cover eight crucial strategies, from establishing the foundational front stage to mastering advanced techniques for Dolby Atmos and multi-seat optimization. You will learn precise, actionable methods for speaker height, angles, distance measurements, and subwoofer integration. By following these detailed steps, you will transform your listening space and unlock the immersive, three-dimensional audio your system was designed to deliver. For a complete overview of our audio-visual solutions, you can explore our main collection of AV mounts and accessories here.
1. Mastering the Front Stage: The Foundational Triangle
Before you even think about rear or overhead speakers, the absolute bedrock of any high-fidelity home theater is the front soundstage. Getting the placement of your left, center, and right (LCR) speakers correct is the most crucial step for achieving an immersive audio experience. This setup is responsible for creating a seamless sonic landscape that pans perfectly with the on-screen action, from a car driving across the frame to dialogue that feels anchored to the actors.
The core principle for the best surround sound speaker placement at the front is the equilateral triangle. Imagine a triangle where your primary seating position is one point, and your left and right speakers are the other two points. For optimal results, the distance between the left and right speakers should be equal to the distance from each speaker to your ears. This precise geometry is what creates a believable sense of space and ensures audio effects transition smoothly across the room.
Implementing the Foundational Triangle
Achieving this "audio sweet spot" is a matter of careful measurement and positioning.
- Create the Triangle: Use a laser measure or a simple tape measure to verify the distances. If your couch is 10 feet from your TV wall, your left and right speakers should also be 10 feet apart from each other.
- Angle the Speakers: The left and right speakers should not face straight ahead. They need to be "toed-in," or angled inward, to point directly at the primary listening position. An angle between 22 and 30 degrees is the industry-standard starting point. Sit in your main chair and have a friend aim the speakers so you can see straight down the barrel of the tweeter.
- Position the Center Channel: The center channel speaker is the hero of dialogue clarity. It must be placed as close to the screen as possible, either directly above or below it. Its tweeter should be aligned with the tweeters of the left and right speakers, ideally at your seated ear level. For many, a soundbar can serve as an excellent, integrated front stage solution, and using specialized soundbar mounts can help you achieve perfect alignment with your TV.
Key Insight: Avoid placing the center channel inside a closed media cabinet. This common mistake muffles dialogue and introduces unwanted resonance. If placement within a cabinet is unavoidable, pull the speaker to the absolute front edge to minimize sound reflections.
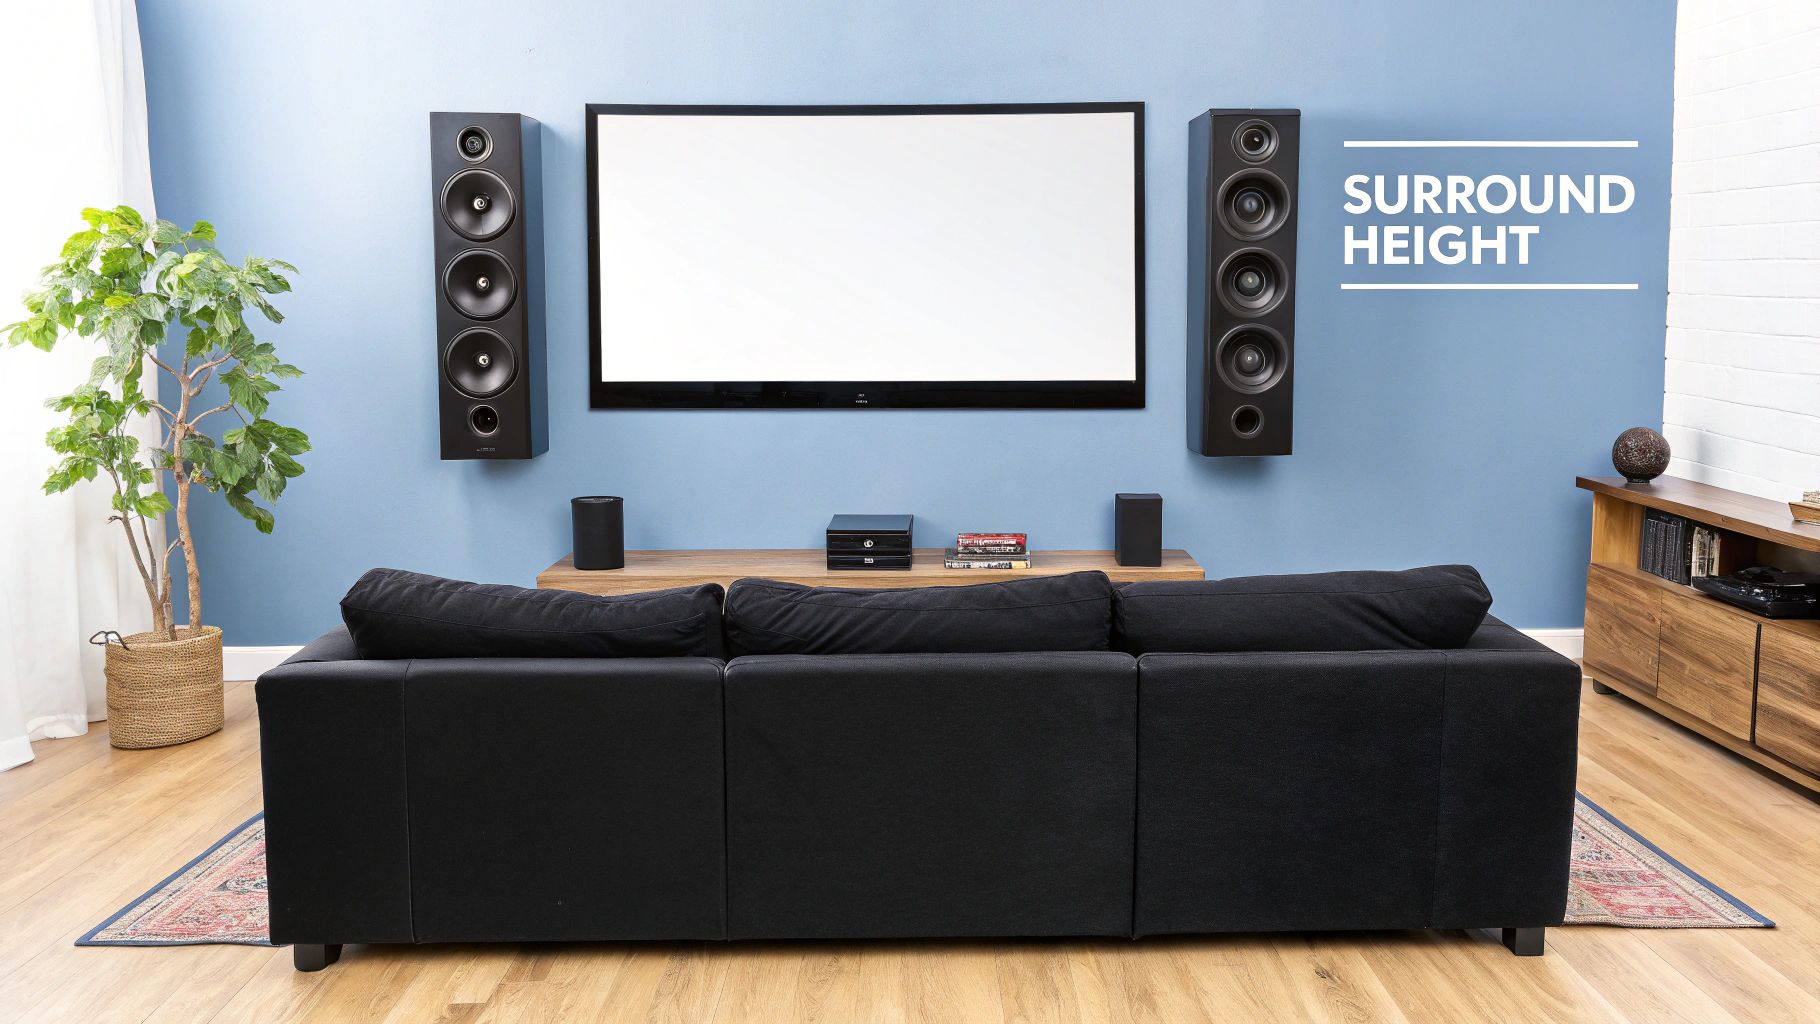
2. Surround Speaker Height and Angle Optimization
Once your front stage is set, the next step in achieving the best surround sound speaker placement is positioning your side surround speakers. These speakers are responsible for creating the enveloping, ambient soundscape that truly pulls you into the action. Unlike the front speakers which provide direct sound, the goal of surrounds is to create a diffuse, immersive field of sound that you feel more than you hear directly.
The core principle, popularized by cinema sound standards from Dolby and THX, is to place these speakers above the listener's ear level. This elevation helps the sound field feel spacious and prevents the audio from being too directional, which can distract from the on-screen visuals. The sound should seem to originate from the environment around you, not from a specific box on your wall.
Implementing Surround Elevation and Angles
Perfecting the placement of your surround speakers involves getting the height and angles just right for your specific room.
- Establish Correct Height: Position your surround speakers approximately 2 to 3 feet above your seated ear level. This elevation is key to creating a sense of atmospheric audio rather than a direct sound source.
- Set the Proper Angle: For a standard 5.1 system, the surround speakers should be placed directly to your sides (90 degrees) or slightly behind you (up to 110 degrees) relative to the center of the screen. They should be angled downward, pointing directly toward the main listening area. This ensures the sound is aimed at the audience for maximum impact.
- Utilize Proper Mounting: Achieving this precise height and angle combination is nearly impossible without the right hardware. Investing in a quality set of speaker mounts and stands with tilt and swivel adjustments is essential for dialing in the perfect position and securing your speakers safely.
Key Insight: Test your surround placement with scenes featuring ambient environmental effects, like a rainstorm or a bustling city street. The goal is for the sound to feel all-encompassing, without you being able to pinpoint the exact location of the speaker. If the sound is too localized, try increasing the height or adjusting the angle.
3. Subwoofer Placement Using the Crawl Test
While your main speakers follow a predictable geometric formula, the subwoofer is a different beast entirely. Low-frequency sound waves interact with a room's dimensions in complex ways, creating "standing waves" that cause bass to sound boomy in some spots and completely anemic in others. The most effective way to find the best surround sound speaker placement for your subwoofer is not by guessing, but by using the counter-intuitive "subwoofer crawl" method.
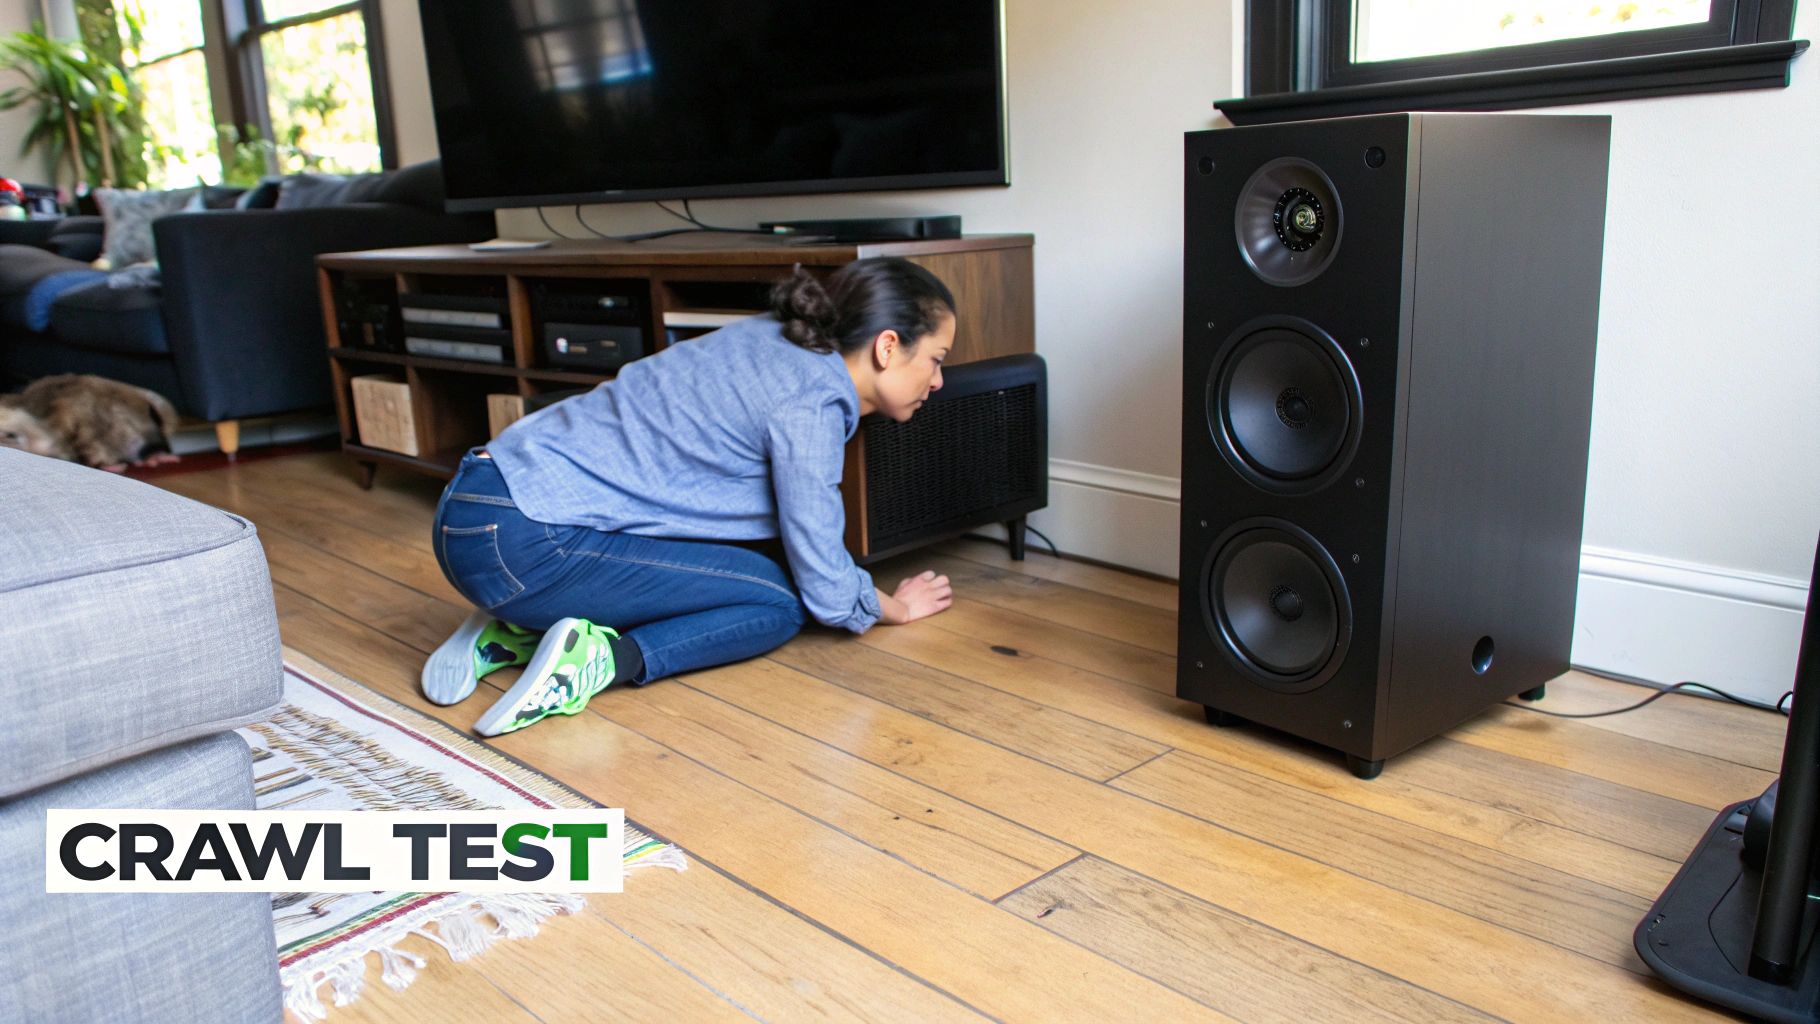
Popularized by audio calibration specialists and championed by figures like audio physicist Floyd O'Toole, this technique reverses the roles of the listener and the speaker. By placing the subwoofer where you normally sit, you can physically move around the room to find where the bass response is smoothest and most impactful. That location is your acoustically ideal spot for the subwoofer.
Implementing the Subwoofer Crawl
This process requires a little effort, but the payoff in bass quality is immense. For a visual guide, the video below provides an excellent walkthrough.
- Swap Positions: Place your subwoofer directly on your primary chair or couch cushion, right where your head would normally be.
- Play a Bass Track: Choose a song or movie scene with a consistent, repeating low-frequency bass line. Avoid dynamic tracks with varying bass levels. A bass frequency sweep track is ideal.
- Crawl the Perimeter: Get down on your hands and knees and slowly crawl around the edges of the room where you might realistically place a subwoofer. Listen carefully to how the bass changes. You will discover spots where the bass is loud and clear and others where it nearly disappears.
- Mark Your Spot: Use painter's tape to mark the one or two locations where the bass sounds the most even, tight, and powerful. These are your candidate positions. Move the subwoofer to the best-marked spot and test again from your listening position.
Key Insight: Don't just stick the subwoofer in a corner out of convenience. While a corner can increase bass output (a phenomenon called "corner loading"), it often results in boomy, inaccurate, and overwhelming bass that muddies the entire soundstage. The crawl test helps you find the perfect balance.
4. Rear Speaker Positioning for 7.1 Systems
While a 5.1 setup provides a fantastic surround experience, upgrading to a 7.1 system introduces a pair of dedicated rear speakers (also called surround back channels) that create a truly enveloping 360-degree soundfield. These speakers are responsible for discrete audio cues originating directly behind you, from a subtle footstep to the roar of a jet engine flying overhead from back to front. Getting the best surround sound speaker placement for these channels is key to unlocking the full potential of formats like Dolby Digital Plus and DTS-HD.
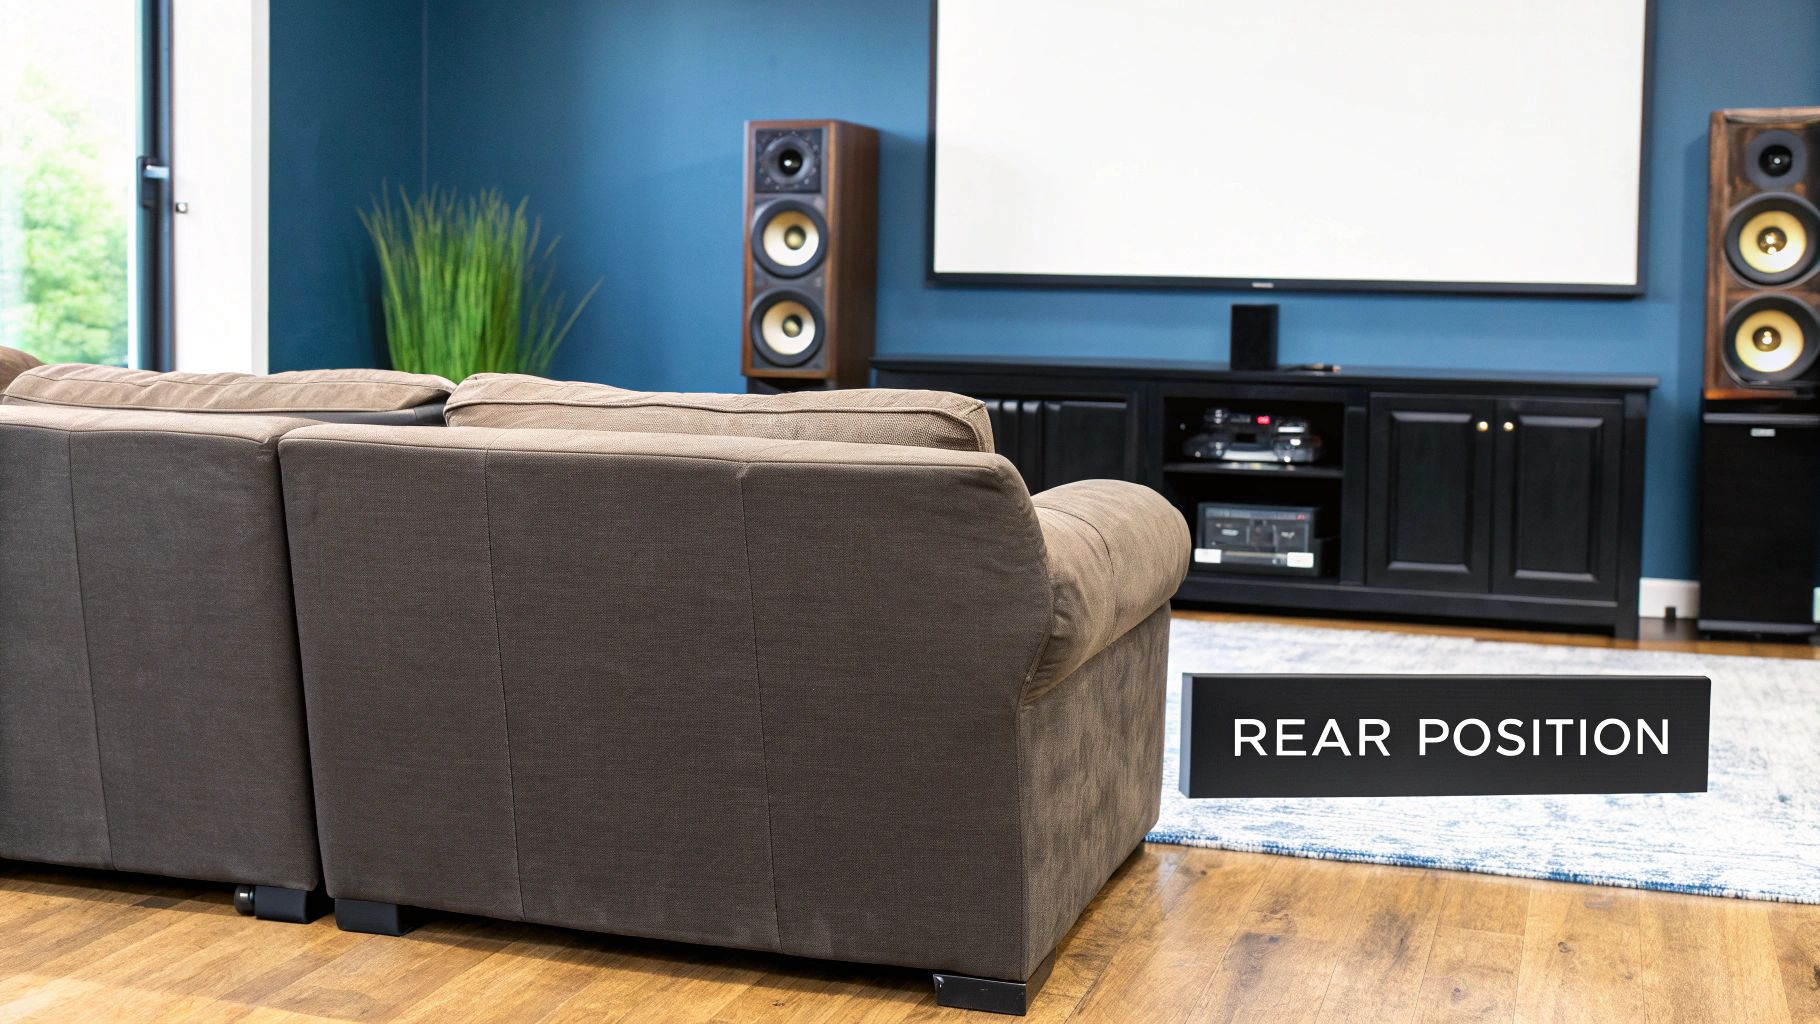
The core principle for rear speaker placement is to create a seamless continuation of the soundscape established by your side surrounds. These speakers should be positioned directly behind the main listening area, forming a complete circle of sound. They are crucial for creating the highly detailed audio environments found in modern blockbuster films and immersive video games, making them a worthy upgrade for any dedicated home theater or premium gaming room.
Implementing 7.1 Rear Speaker Placement
Properly adding these back channels requires careful positioning relative to both the listener and the existing side surround speakers.
- Establish the Angle: Following industry guidelines, the two rear speakers should be placed close together behind the listening position, forming an angle between 135 and 150 degrees relative to the center channel. This ensures effects pan smoothly from the sides to the absolute rear.
- Set the Correct Height: Like side surrounds, the rear speakers should be positioned about two to three feet above seated ear level. This elevation helps create a more diffuse and spacious soundfield, preventing the audio from feeling like it’s coming from an obvious point source right behind your head.
- Manage Speaker Spacing: The distance between the two rear speakers should be relatively narrow, typically three to six feet apart. In smaller rooms, placing them closer together helps solidify the rear audio image. In larger rooms, you can space them a bit wider to broaden the effect.
Key Insight: Ensure your rear speakers are timbre-matched to your side surrounds. Using speakers from the same manufacturer and series is crucial for maintaining a cohesive and believable sound as audio effects move around the room. A mismatch can create a jarring and unnatural transition.
5. Acoustic Treatment and Speaker Boundary Considerations
Once your speakers are in their initial positions, the next frontier for optimization is the room itself. The best surround sound speaker placement must account for how sound interacts with your room's surfaces. Placing speakers too close to walls, floors, or ceilings creates what is known as the boundary effect, a phenomenon that can artificially boost bass frequencies and create an unbalanced, "boomy" sound profile.
Understanding how your speakers interact with these boundaries is essential for achieving clear, accurate, and evenly distributed audio. Walls and corners can either be an acoustic foe or a strategic ally, depending on your setup. By managing these interactions with smart placement and acoustic treatment, you can tame unruly frequencies and ensure your system sounds balanced and natural from every seat.
Implementing Boundary and Acoustic Strategies
Tuning your room's acoustics is a critical step that separates a good home theater from a truly great one.
- Mind the Gap: As a general rule, try to keep your main speakers at least two to three feet away from the rear and side walls. This minimizes the immediate bass reinforcement from the boundary effect, leading to a tighter, more controlled low-end response.
- Treat First Reflection Points: Sit in your primary listening position and have a friend move a mirror along the side walls. The spots where you can see your left and right speakers in the mirror are your first reflection points. Placing acoustic absorption panels in these locations will prevent sound from bouncing off the walls and smearing the audio image.
- Tame the Corners with Bass Traps: Corners are notorious for accumulating low-frequency energy, resulting in muddy, indistinct bass. Placing bass traps in the corners of your room is one of the most effective ways to absorb this excess energy and tighten up the sound across all frequencies.
Key Insight: Don't confuse acoustic treatment with soundproofing. Acoustic treatment (using panels and traps) improves the sound quality inside the room by controlling reflections. Soundproofing is about preventing sound from entering or leaving the room. For more expert insights on how to perfect your setup, you can find a wealth of information in our comprehensive audio and video resources.
6. Height Speaker Integration for Dolby Atmos
Traditional surround sound operates on a horizontal plane, but modern formats like Dolby Atmos and DTS:X introduce a third dimension: height. Integrating height speakers is the key to unlocking this vertical sound field, creating a truly three-dimensional audio bubble. This setup is responsible for some of the most breathtaking sound effects, from rain falling realistically from above to a helicopter flying directly overhead, making it a critical component for the best surround sound speaker placement in a state-of-the-art system.
The core principle behind height speaker integration is to create a seamless hemisphere of sound that envelops the listener. Unlike channel-based audio, Dolby Atmos is object-based, meaning sounds are not assigned to a specific speaker but are placed as objects in 3D space. The system's processor then renders these audio objects through your speaker layout in real-time. To reproduce this accurately, height speakers must be positioned to cover the area directly above the listening position, typically at an elevation angle between 30 and 55 degrees from your ears.
Implementing the Vertical Dimension
Achieving this immersive overhead effect depends on your room's characteristics and the type of speakers you choose.
- Choose Your Method: There are three primary ways to add height: in-ceiling speakers for the most direct and precise effect, on-wall height speakers mounted high near the ceiling, or Dolby Atmos-enabled up-firing speakers that bounce sound off the ceiling.
- Position for Immersion: For a common 5.1.2 setup (5 base channels, 1 subwoofer, 2 height channels), the two height speakers should be positioned slightly in front of and directly in-line with the main left and right front speakers. Imagine drawing a straight line from your front speakers up to the ceiling.
- Calibrate Your System: After installation, it's crucial to run your AV receiver’s auto-calibration routine (like Audyssey, Dirac Live, or YPAO). This process measures the distance and level of each speaker, including the new height channels, ensuring they are perfectly integrated with the rest of your system for a cohesive soundfield.
Key Insight: For up-firing speakers to work effectively, you need a flat, non-absorptive ceiling, ideally between 8 and 14 feet high. Vaulted ceilings, acoustic tiles, or heavy textures will disperse the sound and ruin the overhead effect, making in-ceiling or on-wall options a better choice in those scenarios.
7. Distance and Time Alignment Calibration
Even with physically perfect speaker placement, your audio experience can be subtly compromised if the sound from each speaker doesn't reach your ears at the exact same moment. This is where distance and time alignment calibration comes in, a critical step that digitally corrects for the varying distances between each speaker and your primary seat. This process ensures that sound from all channels arrives simultaneously, creating a cohesive, unified soundfield and dramatically improving the accuracy of sound effect localization.
The core principle is simple: sound travels at a finite speed. The sound from a speaker that is 12 feet away will take longer to reach you than the sound from one that is only 8 feet away. Your Audio/Video (AV) receiver compensates for this by adding a tiny, imperceptible delay to the closer speakers, so that all audio signals converge at your listening position in perfect sync. This is a foundational element of the best surround sound speaker placement, bridging the gap between physical setup and digital optimization.
Implementing Distance and Time Alignment
Most modern AV receivers offer automated systems, but manual verification ensures the highest accuracy.
- Use Automated Systems First: Brands like Audyssey, Dirac Live, and Anthem Room Correction (ARC) use a supplied microphone to measure speaker distances and levels automatically. Run this calibration as your first step after setting up your speakers.
- Measure Manually: Use a laser measure for pinpoint accuracy. Measure the distance from the tweeter (the acoustic center) of each speaker directly to where your head would be in the primary listening position. Input these precise measurements into your receiver's manual speaker setup menu.
- Verify with Test Tones: After inputting distances, use your receiver’s built-in test tones. As the tone moves from speaker to speaker, it should sound consistent in volume and character. Pay close attention to the subwoofer, as its distance setting often benefits from listening tests with familiar music rather than just physical measurement due to room acoustics.
- Synchronize Audio and Video: Beyond speaker-to-speaker timing, ensuring your entire audio track is synchronized with the on-screen action is paramount. If you notice a disconnect, learning how to sync audio with video will help you address any system-wide latency issues for a truly seamless experience.
Key Insight: Don’t just "set it and forget it." If you move your furniture, get a new couch, or even slightly adjust your speaker positions, you must re-run the distance and time alignment calibration to maintain the integrity of your audio sweet spot.
8. Multiple Seating Position Optimization
While creating a perfect "sweet spot" is ideal for a single listener, the reality of many home theaters is a couch full of family and friends. This is where optimizing for multiple seating positions becomes a crucial aspect of the best surround sound speaker placement. Instead of focusing on a single point, the goal shifts to providing a balanced and engaging audio experience across a wider listening area. This involves strategic compromises and adjustments to ensure no one gets a subpar experience.
This approach acknowledges that perfect geometry for one seat is impossible for all seats. Therefore, it prioritizes consistent coverage and intelligibility across the primary seating row. It’s a technique borrowed from commercial cinema design, where every seat needs to deliver a high-quality experience. The aim is to create a large, shared sweet spot rather than a single, pinpoint one.
Implementing a Shared Soundstage
Achieving this balanced sound requires thinking about averages and wider dispersion patterns.
- Target the Center: Instead of aiming speakers at the primary middle seat, adjust their angles to converge on a point slightly behind the geometric center of your main seating area. This broadens the focal point of the sound.
- Widen the Triangle: Slightly increase the distance between your front left and right speakers. This can help create a more expansive soundstage that doesn't feel overly focused on the center viewer. Be careful not to place them so far apart that you create a "hole" in the middle of the soundstage.
- Choose Wide-Dispersion Speakers: Some speakers are designed to spread sound over a broader area. When shopping for speakers, look for models with good "off-axis response" or wide dispersion characteristics, as they are more forgiving in multi-seat setups.
- Test and Calibrate from Multiple Seats: Run your AV receiver's automated calibration (like Audyssey, Dirac, or YPAO) multiple times, placing the microphone in each primary seating position. Most modern systems can average these readings to create a balanced equalization profile for the entire area.
Key Insight: For bass, a single subwoofer often creates "hot spots" (too much bass) and "nulls" (no bass) throughout a room. Using two or even four smaller subwoofers placed strategically is the single most effective way to provide smooth, even bass response for every seat.
Surround Sound Speaker Placement: 8-Factor Comparison
| Aspect | Proper Front Speaker Positioning | Surround Speaker Height and Angle Optimization | Subwoofer Placement Using the Crawl Test | Rear Speaker Positioning for 7.1 Systems | Acoustic Treatment and Speaker Boundary Considerations | Height Speaker Integration for Dolby Atmos | Distance and Time Alignment Calibration | Multiple Seating Position Optimization |
|---|---|---|---|---|---|---|---|---|
| Implementation Complexity 🔄 | Medium - precise angle and distance setup | Medium - wall mounts and angle adjustments | High - time-consuming, involves trial and error | Medium - requires additional channels and spacing | High - complex acoustic interaction analysis | High - ceiling/install and complex integration | High - requires detailed measurement and calibration | High - complex calibration for broad coverage |
| Resource Requirements ⚡ | Low to medium - speakers, stands, measuring tools | Medium - wall mounts, longer cables | Medium to high - equipment movement and listening time | Medium - extra speakers, stands, amplification | Medium to high - acoustic panels, bass traps, treatments | High - specialized speakers, mounting infrastructure | Medium - measuring tools, receiver with delay settings | Medium to high - additional speakers, wider calibration |
| Expected Outcomes 📊 | ⭐⭐⭐⭐⭐ Accurate imaging, dialogue clarity, stable sound | ⭐⭐⭐⭐ Immersive ambient sound, diffuse surround effects | ⭐⭐⭐⭐⭐ Optimized bass response tailored to room acoustics | ⭐⭐⭐⭐ True 360° envelopment, precise rear channel effects | ⭐⭐⭐⭐ Balanced sound, bass control, reduced reflections | ⭐⭐⭐⭐⭐ 3D immersive sound, overhead audio effects | ⭐⭐⭐⭐⭐ Coherent soundstage, phase aligned audio | ⭐⭐⭐⭐ Consistent sound quality across multiple seats |
| Ideal Use Cases 💡 | Basic to advanced surround setups, home theaters | 5.1 systems, gaming rooms, dedicated theaters | Bass-heavy rooms, subwoofer optimization for any room size | 7.1 surround systems, large rooms, gaming | Recording studios, treated home theaters, critical listening | Dolby Atmos-enabled rooms, advanced home theaters | High-end systems needing precise calibration | Social rooms, family theaters, commercial multi-seat venues |
| Key Advantages ⭐ | Stable stereo image, clear dialogue, solid foundation | Enveloping sound field, reduces surround localization | Scientifically accurate bass placement, minimizes nulls | Enhances rear effects, improves positional accuracy | Controls problematic reflections, enhances bass response | Adds height dimension, future-proof audio format | Eliminates phase issues, improves imaging | Supports multiple listeners, flexible seating |
Putting It All Together: Your Blueprint for Audio Excellence
Achieving the best surround sound speaker placement is a journey, not a destination. It’s an incredibly rewarding process that combines technical precision with subjective listening, transforming your living room into a high-performance cinema. The principles we've covered are your comprehensive blueprint for this transformation. You now have the knowledge to move beyond just placing speakers where they fit and can start positioning them where they perform.
This isn't just about following diagrams; it's about understanding the "why" behind each placement. From establishing a solid front soundstage that anchors the dialogue to your screen, to optimizing surround speaker height for immersive effects, each step builds upon the last. Mastering the subwoofer crawl test ensures your low-frequency effects are felt, not just heard, while proper rear speaker positioning in a 7.1 setup completes the 360-degree audio bubble. By layering in acoustic treatments and precisely calibrating for distance and delay, you are actively tuning your room and system to work in perfect harmony.
Your Path to Sonic Perfection
Think of these guidelines as your expert starting grid, not a rigid set of rules. The true magic happens when you begin to experiment. Nudging a speaker a few inches, tilting it slightly, or adjusting a crossover frequency can unlock another level of clarity and immersion. Your ears are the final and most important calibration tool in this entire process.
Here are the key takeaways to guide your final setup:
- Foundation First: Always start with the front left, right, and center channels. A strong front stage is non-negotiable for a coherent audio experience.
- Embrace the Arc: Maintain an equidistant arc from your primary listening position to your front three speakers. This ensures sound arrives at the same time for a seamless sound field.
- Listen, Adjust, Repeat: The best surround sound speaker placement is iterative. Live with a setup for a few days, watch familiar scenes, and don't hesitate to make small adjustments. What looks perfect on paper may need a slight tweak in reality.
- The Goal is Invisibility: The ultimate achievement is when the technology disappears. You shouldn't be thinking about where the sound is coming from; you should be completely lost in the movie, game, or music.
By investing this time and effort, you are guaranteeing that you get every ounce of performance out of your audio investment. You are crafting an experience that delivers sound exactly as the creators intended, a breathtaking, goosebump-inducing spectacle that is worthy of your favorite content.
Ready to secure your speakers for optimal performance and a clean, professional look? Mount-It offers a wide range of high-quality speaker mounts and stands designed for stability and precise positioning. Explore our collection to find the perfect mounting solutions that will help you lock in the best surround sound speaker placement for your unique space.